Showing posts with label FAST Search For SharePoint. Show all posts

Monday, June 6, 2011

Searching a Database with related table using BCS


In the Searching a Database using BCS article, I mentioned we would use the [DimProductCategory] and the [DimProductSubcategory] tables. But in that article, I just use the [DimProductCategory] table. Somebody may be confused with that article that why I mentioned two tables but only one is used. Let me show what I'm gonna do in this article.


In this article, I will show you how to search two related tables.
------------------------------------------------------------------------------------
If you haven't create the setup a data source for [DimProductCategory] table, please refer to the previous article to do that.


Setup related table
1. Open your Microsoft SharePoint Designer 2010, go to External Content Types.
 2. Click External Content Type from the New ribbon
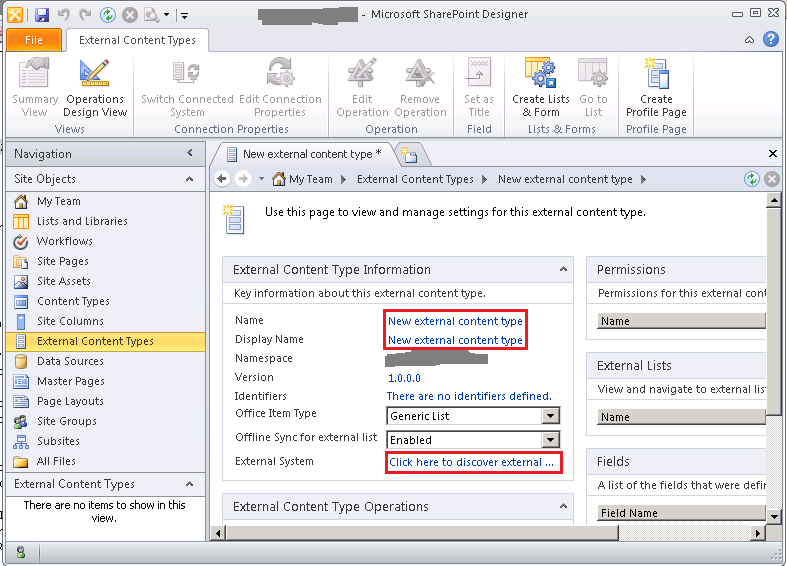
3. Click the New external content type, enter a name, press the Tab button, the Display Name should be filled automatically. Finally, click the Click here to discover external data sources and define operations.
 4. Find out the [DimProductSubcategory] table, and then right click it and then select Create all Operations
 5. In the All operations dialog, click Finish button to finish the dialog. Then, you will see those operations in External Content Type Operations section.
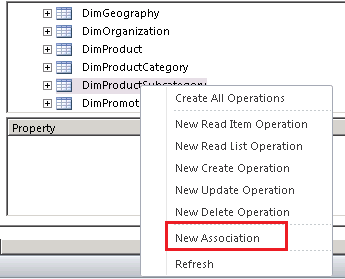
6. Still right click the [DimProductSubcategory] table, click New Association item in the menu.
7. In the Association dialog, click the Browse... button
8. In the External Content Type Selection dialog, select the first one (the master table external content type), and then click OK button, the External Content Type Selection dialog will be closed
9. In the Association dialog, single click the drop down button, and then select the foreign field, and then click the Next button.
10. In the coming step, select the foreign key, and then check the Map to Identifier checkbox, and click the Finish button
  11. Right now, all dialogs are closed. In the SharePoint Designer, click the Summary View from the Views ribbon
12.Select the EnglishProductSubcategoryName from the Fields section, and then click the Set as Title from the ribbon.
13. Click the Save button from left top and then click the Create Profile Page from the ribbon and then close your SharePoint Designer.
 Set Permission for the related table
---------------------------------------------------------------------------------------------
1. Open your Central Administration page, click the Manage service applications under Application Management.
2.  Click Business Data Connectivity Service.
3. Select your related table and then click the Set Object Permissions from the ribbon.

4. Enter your account, click the Add button, and then elect all CheckBox in the permission list. Click OK button from the bottom.

Re-crawl your content source
-------------------------------------------------------------------------------------------
1. Go to your Central Administration page, click Manage service applications under Application Management -> your content query application -> Content Sources (left navigation panel). Click your content source, and then select Start Full Crawl
2. After the crawling complete, go to your FAST Search center web site, enter some keyword like "Bikes", then you will get your result.
3. If you click the second result item, Bikes, you will see the relation profile page.

Wednesday, May 18, 2011

Profile page access exception troubleshoot

As I mentioned in the last post, the profile page may not be able to access with the following error message:
In this case, I would say it should be an authentication issue. To resolve it, we should understand the BCS modes. Please look at the following table
Name SPD Model
Pass Through User’s Identity PassThrough
SSO (Windows) Impersonated Custom/Windows Identity RdbCredentials / WindowsCredentials
Revert To Self BDC Identity RevertToSelf

Let's go through them one by one to get a general idea quickly.
1. Pass Through: authenticate to the external system with the same credentials that were used to authenticate to SharePoint. Kerberos supports only. It will not function by default in NTLM, because NTLM does not allow for delegation of identity
2. SSO: we can use the credentials in Secure Store to sign you in again on the server.
3. Revert To Self: Using Revert To Self means to connect to the external system as the IIS application pool that is servicing the request. Because the application pool of a SharePoint farm is a very highly privileged account, it is not a recommended security practice to use Revert To Self in deployment environments.

All right! We already knew what they stand for currently. Let's focus on how to resolve our issue.
----------------------------------------------
Okay. Based on BCS modes, we have three solutions.
1. Use Kerbero authentication. I haven't try this one.
2. Use SQL Authentication and save the credential into Secure Store service application (Recommend)
For this solution, you can refer to Laura Rogers's post
http://www.sharepoint911.com/blogs/laura/Lists/Posts/Post.aspx?ID=90
The only one point you need to notice is the SQL Server user must have the SQL Authentication permission

3. Use Revert to Self mode.
    a. Click Start -> All Programs -> Microsoft SharePoint 2010 Products -> SharePoint 2010 Management Shell
    b. In the opening window, enter the following commands
        $bdc = Get-SPServiceApplication | where {$_ -match "Business Data Connectivity Service"}
        $bdc.RevertToSelfAllowed = $true
        $bdc.Update()

    c. Restart your server

Monday, May 16, 2011

Searching a Database in SharePoint using BCS

Before we get starting on searching a database, we need to get a sample DB. In this case, I’m gonna use AdventureWorksDW2008R2 database. It can be downloaded from http://msftdbprodsamples.codeplex.com/releases/view/55926
I prefer to use the [DimProductCategory] and the [DimProductSubcategory] tables. Let’s look at the relationship between them.
--------------------------------------------------------------------------
Setup an External Content Type for DB
1. Click Start -> All Programs -> SharePoint -> Microsoft SharePoint Designer 2010
2. Click Open Site, enter your site collection URL and then click OK button
3. Click External Content Types from the left navigation, and then click the External Content Type from the ribbon -> New
4. Click the New external content type, enter a name, press the Tab button, the Display Name should be filled automatically. Finally, click the Click here to discover external data sources and define operations.
5. In the Operations Design View, Click the Add Connection button.
6. In the External Data Source Type Selection dialog, select SQL Server and then click OK button.

7. In the SQL Server Connection dialog, enter your Database Server, Database Name and keep selecting Connect with User’s Identity
8. Expand the AdventureWorksDW2008R2 Database -> Tables, find out the [DimProductCategory] table, right click it and then click the Create all Operations
9. In the All Operations dialog, click Finish button, you will see those operations in External Content Type Operations section.
10. Click Summary View from Views
11. From the Fields List, select the EnglishProductCategoryName and then click the Set as Title from the ribbon -> Field
12. Click the Save button and then close the SharePoint Designer
-------------------------------------------------------------------------------
Setup a content source and then crawl it
1. Go to your SharePoint 2010 Central administration, click Manage service applications -> <Your Content Application> -> Content Sources
2. Click New Content Source to create a new content source
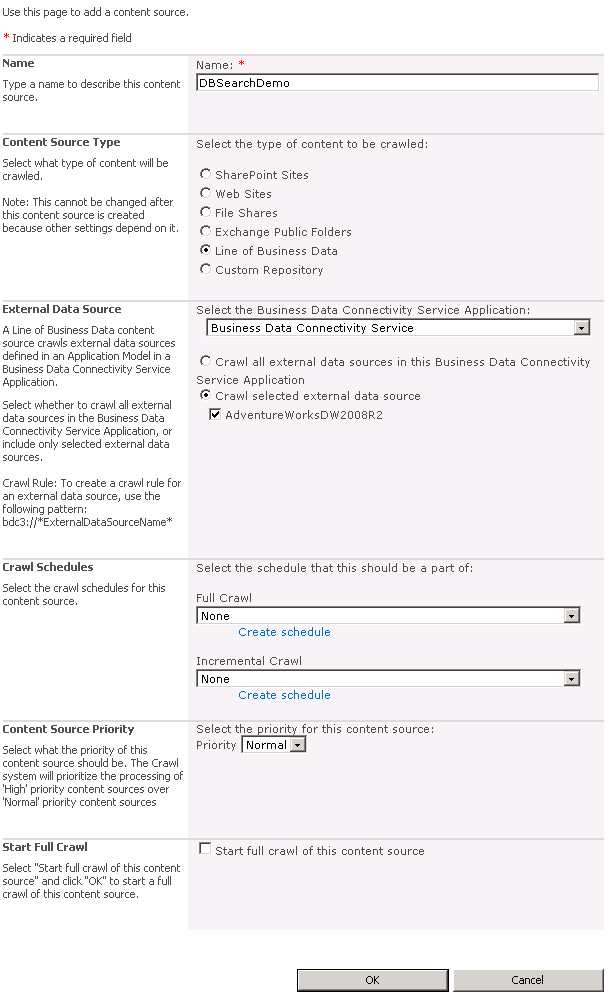
3. Enter a new Name, select the Line of Business Data, select Crawl selected external data source and check the <your external content type>, and then click OK button to close the window
4. Go back to your Central Administration page, click the Manage service applications -> Business Data Connectivity Service


5. Select your new data source and the click Set Object Permissions
6. In the opening window, enter your domain user, click Add button, give all permissions to him/her and then click OK button.
7. Go back to your content source page, click the narrow down button, and then click the Start Full Crawl item
8. After the crawling finished, go to your FAST Search Center site, enter a keyword (Like Bikes) and the press ENTER button


 ----------------------------------------------------------------------
Create a Profile page to look at the query result
If you click the query result, you may get the following error. The reason is IE doesn’t know how to display the data with bdc3 protocol.
Fortunately, the BCS option support a nice feature names Profile Pages which we can use it to look at the query result.
1. Go to one of your site collection, click Site Actions -> New Site
2. Select the Blank Site, enter the title and the URL, then click Create button to create the site. Copy the URL.
3. Go to your SharePoint 2010 Central Administration, click Manage service applications -> Business Data Connectivity Service
4. In the Service Application Information page, click the Configure from the ribbon -> Profile Pages
5. In the opening window, paste the site URL to the text box and then click OK button
6. After the window closed, check your content type, and click the Create/Upgrade button from ribbon -> Profile Pages. Click OK button to finish the action.
7. After the creation completed, click the OK button to close the window.
8. Re-crawl your content source, after it competed, go to your FAST Search Center site, enter a keyword, you will get the result. Click the link, you will see the profile page.
Exception: If you are running into credential issue like:
Please refer to another article to resolve this issue.