Tuesday, February 3, 2015

Install fcitx for KDE with Fedora

Install fcitx

1. Use root account
2. Run following commands to install fcitx:

yum install fcitx, fcitx-qt4, fcitx-configtool, fcitx-cloudpinyin, fcitx-pinyin, fcitx-table, fcitx-table-chinese, kcm-fcitx

Configure fcitx

After install fcitx, you need to configure it
1. Create a fcitx.sh file in /etc/profile.d/
2. Add following code to this file:

export XMODIFIERS="@im-fcitx"
export QT_IM_MODULE=fcitx
export GTK_IM_MODULE=fcitx

Now, restart your computer and you should be good to go. Open a konsole, run fcitx and it should be started.

Autostart fcitx

If you want to have fcitx auto start with your kde, you need to run following command:

ln -s /usr/share/applications/fcitx.desktop ~/.config/autostart/fcitx.desktop

Restart your computer and you should see the difference.

Thursday, February 27, 2014

Install official nvidia driver on Arch Linux with my Lenovo Y400 (video card GT 650M)

I must be a stupid guy because it took me 2 weeks to resolve this issue. I've been switch drivers between nouvean and nvidia official driver for a long time and I never run it out. :(

1. The issue I met

If you follow the Arch Linux wiki to install the official nvidia driver and found the screen is turned to black, the fan starts spinning and the system completed die after a while, this article may help you out!

2. nvidia driver conflicts with new kernel

I found an article in nvidia forum, which mentioned there is a conflict between nvidia driver and kernel 3.10+. You have to re-compile your kernel, update your initramfs and then add a parameter to your boot file.

3. Recompile kernel

Download the latest kernel from http://www.kernel.org/
Change your .config file
from:
  1. # CONFIG_HZ_100 is not set
  2. # CONFIG_HZ_250 is not set
  3. CONFIG_HZ_300=y
  4. # CONFIG_HZ_1000 is not set
  5. CONFIG_HZ=300
to:
  1. # CONFIG_HZ_100 is not set
  2. # CONFIG_HZ_250 is not set
  3. # CONFIG_HZ_300 is not set
  4. CONFIG_HZ_1000=y
  5. CONFIG_HZ=1000

Follow the wiki page to compile your kernel
https://wiki.archlinux.org/index.php/Kernels/Compilation/Traditional

Note: remember to re-generate your initramfs file. This is very important

4. Add kernel parameter

Edit your gummiboot file: arch.conf
add a parameter at the end:
rw quiet rcutree.rcu_idle_gp_delay=1

Then reboot your system.

Now, test your xort with startx. You should be OK.

Install nouvean driver on Arch Linux with my Lenovo Y400 (video card GT 650M)

Install the open source nouvean video driver with Lenovo Y400 (with nvidia GT 650M) should be easy. Just follow the official wiki page should be good.

1. Install Arch Linux

If you already install the arch linux, you may skip this section. Just install Arch Linux follows the official wiki without installing xorg.
https://wiki.archlinux.org/index.php/Beginners%27_guide

2. Install nouvean

By default, the nouvean module should be loaded after you installed the Arch Linux. You can use the following command line to double check if the module is loaded.

lsmod | grep nouvean

If it's loaded, you can continue installing the nouvean driver. Follow the wiki page to finish that.
https://wiki.archlinux.org/index.php/nouveau

After that, reboot your linux and then check if the module is loaded again.


3. Install xorg

Now it's the time to install xorg. Follow the wiki page to finish your installation.
https://wiki.archlinux.org/index.php/Beginners%27_guide

After the installation, I still reboot my linux and check if the nouvean is loaded. But I guess you can skip this step.

4. Install KDE

I'm a KDE guy. So it's the time for me to install KDE. You can install other EE as your wish.

Monday, September 10, 2012

Moving all databases to another server without changing connection string

Today I'm gonna talk about how to moving all databases to another server without changing connection string in web.config, app.config and whatever configuration file.

Problem
Today I met an issue that my current SQL Server needs to be operated for some reasons and the SQL Server service will be offline for a few days. Our application is a global service for the company and it can't be offline for a long time. This means we have to move all databases from the current server to a backup server.

Solution
The basic idea is that create a backup server and restore all databases on it. Then setup a redirect function on the original server so that all requests can be redirected to the new server. This function is called "Alias" in SQL Server, which can be configured in Sql Server Configuration Manager -> SQL Native Client.

There are two summary steps to complete this solution:
1. Backup all databases from the original databases and restore them on the backup server.
2. Setup an Alias on the original server to redirect all requests to the backup server.

A. Backup and Restore
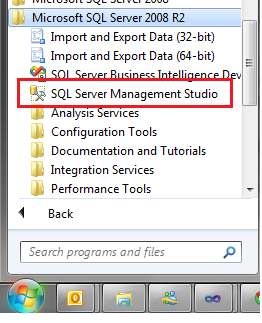
1. Open your SQL Server Management Studio from Start -> All Programs -> Microsoft SQL Server 2008 -> SQL Server Management Studio
2. Login to the current DB server with your credential.
3. Right click you database, select Tasks -> Back Up...
4. Change the backup directory, and then click OK.
5. Copy the backup file to the new DB Server.
6. Follow step 1 to login the new DB server.
7. Right click the Databases node and then click the Restore Database...
8. Select From device, choose the backup file, and then select the database name from the To database drop down list. Click OK button.
9. Now, you have moved the target database from the original server to the backup server.

B. Setup Alias
After you move all database from the original server to the backup server, the next step is setup a redirect settings in the original server to redirect all requests to the backup server. This setting is called 'Alias' in SQL Server.

1. Select SQL Server Configuration Manager from Start -> All Programs -> Microsoft SQL Server 2008 -> Configuration Tools
2. Expand the SQL Native Client 10.0 Configuration -> Aliases. Generally there will be two menus, one is for 32 bit, the other is for 64 bit.
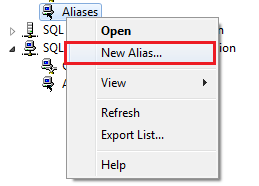
3. Right click the Aliases, select New Alias...
4. There are four fields need to be entered. The Alias Name, the Port No, the Protocol and the Server.
The Alias Name should be the 'Data Source' in your connection string
The default Port No is 1433
The Protocol should choose TCP/IP
The Server field should be the new SQL Server name.
5. After filling this dialog, click OK button to complete the setup. Make sure you setup the alias both in 32 bit and 64 bit.
6. Now, you backup server is ready to go. Disable you current SQL Server service and try your applications, it should work.

Friday, June 22, 2012

Best Practices for Speeding Up Your Web Site

Best Practices for Speeding Up Your Web Site

MVC knowledge

1. Custom Helper
Create a new Class and use the following code
public static class MyHtmlHelper
{
    public static MvcHtmlString Image(this HtmlHelper helper, string src, string altText)
    {
        var builder = new TagBuilder("img");
        builder.MergeAttribute("src", src);
        builder.MergeAttribute("alt", altText);
        return MvcHtmlString.Create(builder.ToString(TagRenderMode.SelfClosing));
    }
}
In cshtml layout page, add @using namespace on the top, the use @Html.Image(src, altText) at any place.

If we need to use this method in any layout pages, we should open the web.config file which is under Views folder, add <add namespace="namespace"/> in <namespce> block.

2. Custom Validation
There are two ways to custom the validation. The first one is custom attributes, the second one is use IValidatableObject interface.

Make the model inherits from the IValidatableObject interface, and then implement it. Such as
public IEnumerable<ValidationResult> Validate(ValidationContext validationContext)
{
    // Write your custom validation code here and then
    yield return new ValidationResult("error message", new[] { "fields that against the validation" });
}

In this way, the error message will be displayed behind the fields.

3. Quick add script link
Create the following code in your cshtml layout page,
@helper Script(string scriptName)
{
    <script src="@Url.Content("~/Scripts/" + scriptName)" type="text/javascript" />
}

Then you can use it in your layout page, like @Script("jquery.min.js")
Note: this script method is only available in current layout page, if you want it to be available in any layout pages, you either create a custom helper in C# code or do the following things.

Create a App_Code folder under this Mvc project, create a new MVC view page with name "Content", delete all content in that file, and then type the following code

using System.Web.Mvc;
@helper Script(string scriptName, UrlHelper url)
{
    <script src="@url.Content("~/Scripts/" + scriptName)" type="text/javascript" />
}

Then you can use it in any layout pages, like @Content.Script("jquery.min.js", Url)

Monday, April 23, 2012

[Forward] Running 32-bit SSIS in a 64-bit Environment

Original Source: http://sqlblog.com/blogs/john_paul_cook/archive/2010/03/24/running-32-bit-ssis-in-a-64-bit-environment.aspx

After my recent post on where to find the 32-bit ODBC Administrator on a 64-bit SQL Server, a new question was asked about how to get SSIS to run with the 32-bit ODBC instead of the 64-bit ODBC. You need to make a simple configuration change to the properties of your BIDS solution. Here I have a solution called 32bitODBC and it needs to run in 32-bit mode, not 64-bit mode. Since I have a 64-bit SQL Server, BIDS defaults to using the 64-bit runtime. To override this setting, go to the property pages for the solution. Select the Debugging node. Select Run64BitRuntime and set it to False. Save your changes.
image
What about when you finish your work in BIDS and you want to use the 32-bit runtime outside of BIDS? It depends on where you execute your package from.
If you double-click a dtsx file from Windows Explorer, it is executed by the SQL Server 2008 Integration Services Package Execution Utility. The default fully qualified path for that tool is C:\Program Files (x86)\Microsoft SQL Server\100\Tools\Binn\VSShell\Common7\IDE\DTExecUI.exe. In other words, it is a 32-bit product, so it doesn’t have any trouble running things in 32-bit mode by definition.
Here’s part of the error message generated from executing the package from a SQL Server Agent job using the default settings:
Description: System.Data.Odbc.OdbcException: ERROR [IM014] [Microsoft][ODBC Driver Manager] The specified DSN contains an architecture mismatch between the Driver and Application
The clue is the part about the architecture mismatch. Using the 64-bit runtime is the default behavior. Fortunately this is easy to change within the job definition by checking the Use 32 bit runtime checkbox.
image

Friday, April 20, 2012

4.1 Maximum Sub Array

I studied the maximum sub array problem from <Introduction to Algorithms>. I'm gonna write down the notion so that I can recall it in the future easily.

The problem
I won't describe the whole problem such as buying or selling a stock. Instead, I'm going to describe the the problem in another words. For a given integer array, which contains some positive or negative values, try to find a continuous sub array that the sum is the maximum.

Here is an example:
Array = {13, -3, -25, 20, -3, -16, -23, 18, 20, -7, 12, -5, -22, 15, -4, 7}
From the given array, we can easily find out the sub array, which is {18, 20, -7, 12}. We can get it because we are good at mathematics. But how to resolve it in programming? That's the maximum sub array problem.

The traditional solution
I do not want to speak so much about the traditional solution coz the most of programmer can tough it when he/she really think about it. But I still need to describe them because we can analyze it and compare with the Divide-Conquer-Combine solution. Okay, here we go!

The easily way to resolve this problem is adding these items one by one, comparing the sum to get the maximum sum, iterating all array items. After that, we will get the maximum sum sub array. Here is the pseudocode:

GetMaxSum(int currentIndex)
{
    sum = -∞;
    max = -∞
    right = -1;
    for(int i = currentIndex; i < array.Length; i++)
    {
        sum += array[i];
        if(sum > max)
        {
            max = sum;
            right = i;
        }
    }
    return (currentIndex, right, max);
}

This is the core code, and we still need a calling procedure, which will iterate the whole array and compare the result one by one. Such as:
First value 13: -3, -25 .......
Second Value -3: -25, 20, -3 .......

We can easily analyze the running times. In the for loop in the GetMaxSum method, it costs array.Length - current index times. For the calling procedure, because we will iterate the whole array (except the final one), which length is array.Length - 1. So the final running times should be ((array.Length -1) + 1)*(array.Length - 1)/2. In another words, it's (n-1) + 1)*(n-1)/2. So far, we can easily get the Î˜(n2).

The Divide-Conquer-Combine solution
For the divide-conquer-combine solution, we can divide the array to two parts, such as [first, mid] and [mid + 1, last]. Then, we can try to find the sub array. But before that, it looks like we miss one important criterion that the sub array can cross the mid, which is [i, j]. i first < i < mid, mid < j < last. That's an important one. Okay, now we get three criteria:
1. sub array are in [first, mid]
2. sub array are in [mid + 1, last]
3. sub array are in [i, j], i first < i < mid, mid < j < last

Let me show the pesudocode for the third one first:
GetCrossingSubArray(int mid)
{
    left = -1
    leftMax = -∞;
    sum = -∞;
    for(int i = mid; i >= first; i--)
    {
        sum += array[i];
        if(sum > leftMax)
        {
            left = i;
            leftMax = sum;
        }
    }

    right = -1

    rightMax = -∞;
    sum = -∞;
    for(int i = mid; i <= last; i++)
    {
        sum += array[i];
        if(sum >  rightMax)
        {
             right = i;
             rightMax = sum;
        }
    }
    return (left, right, leftMax + rightMax);
}

Also, we still need the call procedure. Absolutely, it contains the criteria 1 and 2. That is:
GetSubArray(int first, int last)
{
    if(first == last)
        return (first, last, array[first]) //only one element
    else
    {
        int mid = (first + last)/2;
        leftMax = GetSubArray(first, mid);
        rightMax = GetSubArray(mid + 1, last);
        crossingMax = GetCrossingSubArray(mid);
        if(leftMax > rightMax && leftMax > crossingMax)
            return leftMax;
        else if(rightMax > leftMax && rightMax > corssingMax)
            return rightMax;
        else
            return crossingMax;
    }
}

For analyzing this algorithm, we need to calculate the running time separately. For the GetCrossingSubArray, the for loop is a constants time, which is n. For the GetSubArray, the running time is T(n) = 2T(n/2) + GetCrossingSubArray, which is T(n) = 2T(n/2) + n. Therefore, the final running times are: Î˜(nlgn) + Î˜(n). (Considering the GetSubArray as a tree, each level's sum is n. The tree high is lgn, which is the same with merge sort)

Tuesday, April 10, 2012

Register HttpModule in IIS6 and IIS7


For IIS6 and IIS7 Classic Mode register your module in web.config in the following manner:
<configuration>
  <system.web>
    <httpModules>
      <add name="Your HttpModule name" type="Namespace.ClassName,AssemblyName"/>
    </httpModules>
  </system.web>
</configuration>
For IIS7 in Integrated Mode do the following:
<configuration>
  <system.webServer>
    <modules>
      <add name="Your HttpModule name" type="Namespace.ClassName,AssemblyName"/>
</modules> </system.webServer> </configuration>

Monday, March 26, 2012

ESP JDBC Connector can't establish a connection to SQL Server database

The Problem
I setup a new ESP Server and install JDBC Connector on it. But it always threw an exception when I trigger the run from command line:

13:07:59,691 ERROR [JDBCConnector] Excpetion thrown in adapter class: com.fastsearch.esp.connectors.jdbc.JDBCAdapter, Could not connect to database: The driver could not establish a secure connection to SQL Server by using Secure Sockets Layer (SSL) encryption. Error: "RSA premaster secret error".
13:07:59,693 ERROR [JDBCConnector] Caused by: Could not connect to database: The driver could not establish a secure connection to SQL Server by using Secure Sockets Layer (SSL) encryption. Error: "RSA premaster secret error".
13:07:59,697 ERROR [JDBCConnector] Caused by: The driver could not establish a secure connection to SQL Server by using Secure Sockets Layer (SSL) encryption. Error: "RSA premaster secret error".
13:07:59,698 ERROR [JDBCConnector] Caused by: RSA premaster secret error
13:07:59,699 ERROR [JDBCConnector] Caused by: SunTlsRsaPremasterSecret KeyGenerator not available


But the connector works fine if I trigger the run from Admin UI.

The Reason
I searched this issue in Google for a couple of hours and someone said the JDBC Connector will always use SSL encryption for SQL Server if it can. There is no way to disable it.

The Solution
Someone mentioned that we can install the new Microsoft JDBC Driver version but it is still helpless. Fortunately, I have another server setup with 'Correct' environment. I compared a quite folders, configure files and figured out the real solution.

After changing the java environment settings with following parameters, the JDBC Connector start working for me. Hopefully it still work for you. :)

Variable Value
Java_Home C:\Program Files (x86)\Java\jre
ClassPath .;%JAVA_HOME%\lib\dt.jar;%JAVA_HOME%\lib\tools.jar
Path %JAVA_HOME%\bin

Thursday, December 15, 2011

ESP JDBC Connector numbs and can't continue

Hi guys,

As you guys knew, I'm working with FAST ESP in the past of few months. Today my team member encountered a big issue, which blocks our task, the JDBC Connector does not work. You know what, all of our data need to be crawled by FAST ESP. So without the ESP, our product/code is a bullshit!!! Right now you can imagining how I'm surprised this morning.

OK, I guess you guys don't want to spend so many time to read my bosh. Let's focus this problem.

Problem
If your data comes from any DBs, you may use JDBC Connector to pull out all data from DB to ESP. I have the same scenario. Only one special point is that I'm wanna use standalone mode, which will use connect.bat file under %JDBC Connector Installed Directory%\bin to trigger the process.

This morning, my friends told me that this batch file numbs and can't continue. It stayed at 'Starting publisher thread 0', like this:


The process sleeps there and won't wake up for never. There is no error, no break and no any other information that you can refer. My friends try to change some settings under our configuration file, change some DB settings, reinstall JDBC Connector but it's still the same. If you have the same issue, then you are lucky because I find out the cause and the solution.

Cause
I have to say I'm so lucky that I know there is a software named ProcessMonitor.exe producted by Microsoft, which can be used to monitor all processes, files and registers access. I use this tool to monitor the java.exe process and found there are some interface/properties in some jar files are not found. (I didn't capture any screenshot when I investigate this issue) Actually I know nothing about Java but I heard some complains that someone's software doesn't work after they upgrade their java version.

Another lucky thing that I can resolve this issue is that I have 3 ESP servers that I can use them to compare the environment. When I look at the other two servers, whose JDBC Connector works fine, the java version is 1.6.0_25-b06. The broken server's java version is 1.6.0_29_b11. At that time, I was thinking this issue may be caused by the upgraded java version. In a fact, I'm right!

Solution
Now, you already knew the culprit and you may get the solution. Yes, the solution is revert the java version. I uninstalled the latest version and reinstall the 1.6.0_25_b06. After rebooting the system, the JDBC Connector comes back. Oh! I'm so lucky!

OK. If you faced the same problem with JDBC Connector, I hope this article can give you some help.

[Forward]SQL Server 2005 WMI Provider Error

I recently resolved an error with the SQL Server 2005 Configuration Manager. Occasionally, during setup, some .mof files don't get installed and registered correctly. There is a program called mofcomp that is responsible for registering and storing the data associated with .mof files. If the .mof file information becomes damaged or compromised, or never installed correctly, the problem will result in an error message like below:

Cannot connect to WMI provider. You do not have permission or the server is unreachable. Note that you can only manage SQL Server 2005 servers with SQL Server Configuration Manager. Invalid class [0x80041010]

The solution is to go to a command prompt and then run mofcomp.

C:\Program Files\Microsoft SQL Server\90\Shared>mofcomp "C:\Program Files\Microsoft SQL Server\90\Shared\sqlmgmproviderxpsp2up.mof"

The output will look like below

Microsoft (R) 32-bit MOF Compiler Version 5.1.2600.2180
Copyright (c) Microsoft Corp. 1997-2001. All rights reserved.
Parsing MOF file: C:\Program Files\Microsoft SQL Server\90\Shared\sqlmgmprovider xpsp2up.mof
MOF file has been successfully parsed
Storing data in the repository...
Done!

On servers, the .mof file will be sqlmgmprovider.mof.

From: http://blogs.msdn.com/b/echarran/archive/2006/01/03/509061.aspx

Sunday, September 25, 2011

Create a WCF Service for windows authentication

WCF, stands for Windows Communication Foundation, is a component of Microsoft .NET Framework 3.0. Fortunately, I have a project based on WCF and Windows Authentication. I have been spending a lot of time to study how to create a WCF Service with windows authentication. In this article, I'm gonna share my knowledge.

My Goal
The reason I want to have the WCF Service uses windows authentication is there are some sensitive data in our service. We don't want to everyone have the access to look at the data or service schema. And I don't want to write any custom code coz our project schedule is a little bit busy. So, we decided to use windows authentication and configure the access permission in IIS, which will save our team a lot of time.

Create WCF Project
1. Open your Visual Studio 2010, from Start -> All Programs -> Microsoft Visual Studio 2010 -> Microsoft Visual Studio 2010
2. Create a new Silverlight project with an empty template.
3. Click OK button to finish the wizard with ASP.NET Web Application Project type.
4. Right click the solution file, select Add -> New Project
5. Select WCF from left panel, and then select WCF Service Application from the list. Click the OK button to create the project.
6. Select both the IService1.cs and the Service1.svc files in the WcfService project and then delete them.
7. Right click the WcfService Project, select Add -> New Item
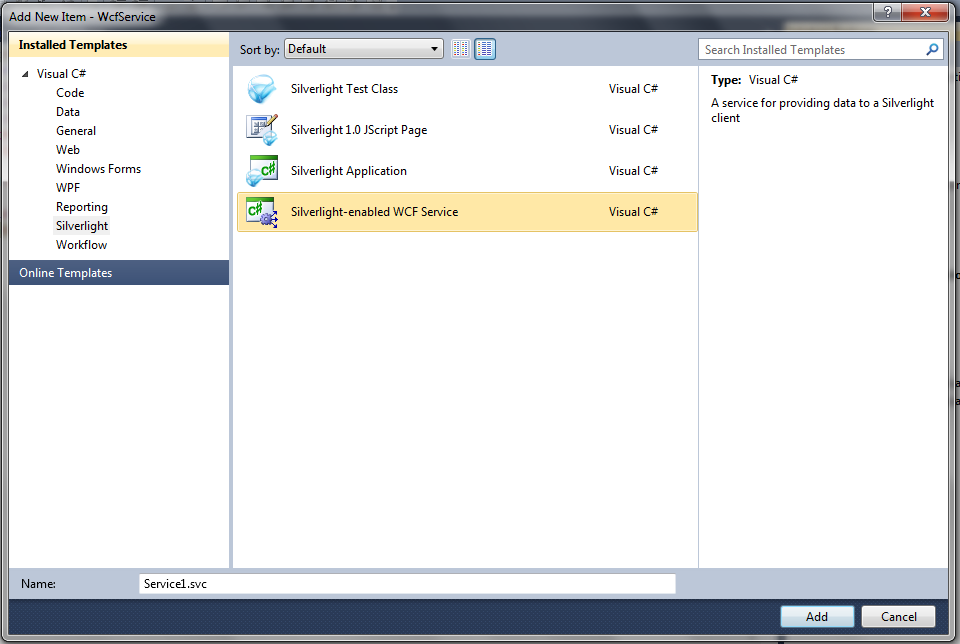
8. Select Silverlight from the left panel, and then select the Silverlight-enabled WCF Service from the list. Click the OK button to finish the wizard.
9. Double click the Web.config file in the WcfService project.
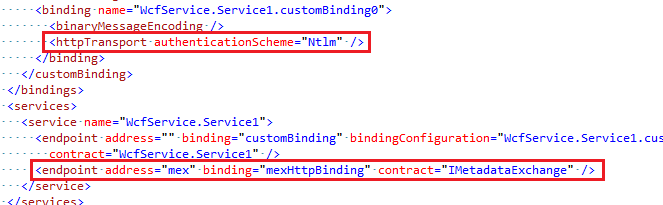
10. Add an authenticationSchema="Ntlm", remove metadata endpoint
11. Create a service method to read some data from DB
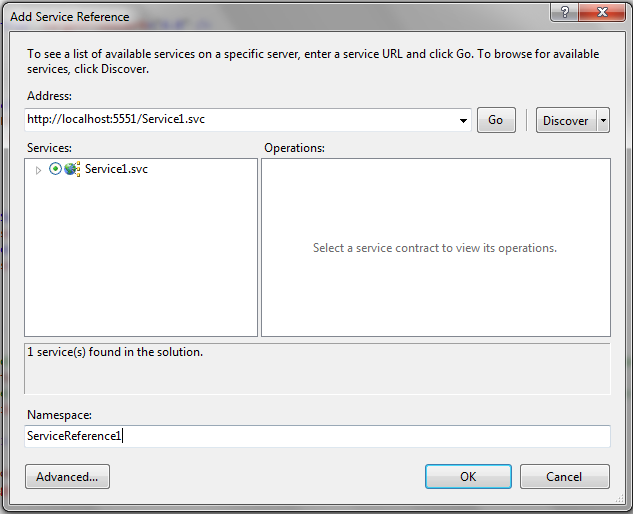
12. Add the WcfService reference to the Silverlight project
13. In silverlight project, add some controls to display the value which is got from that service method.
14. You can build and debug the project. (the value is got from DB.)

Deploy the project
When you debug the project, you can use the authenticationSchema="Ntlm", but when you try to deploy it, you need to change.
1. Double click the Web.config file in the WcfService project.
2. Change the authenticationSchema="Negotiate"
3. Deploy the service project to your server.
4. Edit you service reference address to the new web address.
5. Deploy the silverlight project to your server.
6. You have to set both the service web site and the silverlight web site as Windows Authentication.
7. Browse your asp.net page, you should be able to see the value read from DB.

Note: if you still can't see the value, please make sure if you did the following setting
* You have the cross domain file for your service web site
* You have turn the authentication schema to Negotiate
* You have set all sites as Windows Authentication and turned off the Anonymous Authentication

InfoPath programming: work with repeatable table

Long time not write any articles, this time I'm gonna introduce the InfoPath Programming.

First of all, let me show you why we need to use InfoPath. I work for a small company and our company has a private corp net. The corp net includes one database, a couple of services and some applications. Our goal is gather all clients' feedback and save them into our database.

However, the limitation is we cannot open a public web application because of the security reason. That means we must have some other plans to gather all information. Also, we also don't want to use Excel/Word because clients may easy to change the format and it's hard for us to import the data into our database. Then, we think about the InfoPath.

As you known, we can use InfoPath to design a powerful form and let user to fill out the form and then send it back. To use the InfoPath to complete our task, we assume:
1. All users have the InfoPath installed
2. All users won't change the form design

Before starting the programming, we need to understand the InfoPath Security settings. The basic concept is if you need the InfoPath to access any resource out of the form, then you need a domain/full trust level. Otherwise, you can use restricted level. The more details can be found from here.

This article is talking about how to program with InfoPath. Now, let's go the way.

Create Fields for your form
-------------------------------------------------------------------
1. Click Start -> All Programs -> Microsoft Office -> Microsoft InfoPath Designer 2010 (You may use Microsoft Info Designer 2007, it doesn't matter)
2. Select the form template and then click 'Design Form'. For me, I'm gonna use 'Blank Form'.
3. Change some settings. I don't want the InfoPath generates some fields automatically when I insert the control, so I'm gonna change the default settings.
a. Click the small button from the ribbon, then you will the additional control panel.
b. Un-check the 'Automatically create data source' checkbox.
 
4. Now, we can start to design our InforPath form. Let's create some fields first. Close the control panel, right click 'myFields' item from the Fields Panel.
 
5. Click the 'Properties' menu item.
6. In the pop up dialog, change the name of the field and then click the OK button. Note: this field will become the root node of your xml file.
 
7. Now, I'm gonna create some fields under the root node. Right click the the Customer node, and then click 'Add' from the menu item. In the pop up dialog, enter the field name and keep the other settings. Click the OK button.
 
8. Create another field. This time, select Rich Text from the Data type.
 
9. Now, we assume we need to gather their products. Absolutely, one company may have a lot of products, it's a collection. That means we need to create a repeatable table.
Right click the Customer item, click add from the menu item. Enter a name for the collection, select 'Group' from the 'Type' drop down list and check the 'Repeating' checkbox, and then click the OK button.
 
10. Then we can add some fields for the product object. Just simple repeat step 7 to add your fields.
 
Now, all fields are created and we are ready to design the form.
Design InfoPath Form
-----------------------------------------------------------------------------
1. Change form title. Click the 'Click to add title' and then enter the form title.
 
2. Click the 'Add tables' to edit the form title and then click the 'Add tables'.
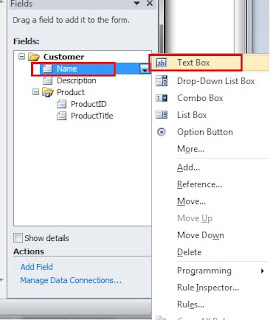
3. Right click the 'Name' from the Fields Panel, and then click the Text Box control.
4. Then a Text Box should be created  in the form.
5. Right click the 'Description' from the fields panel and then click the 'Rich Text Box', then a rich text box shows up.
6. Right click the 'Product' group, and then click 'Repeating Table'. The result are:
7. All controls are created but there is no label here. We can add some labels like the pic blow.
8. Now, we can start to test it. Save it in your disk and then double click the xsn file to open a new form.
Programming with InfoPath
-------------------------------------------------------------------------------
So far, we already have the form and customers can use this form to fill out their information. However, we have some data saved in our Database. Our goal is to ask customers update their information based on the current data we have. So we have to read data from database, fill out the form and then send it to the customer. Once they update the information, send it back to us, then we'll upload the data to our database. In this article, I won't explain how to get data from database. Instead, I just introduce how to work with the InfoPath form.

First of all, we need to setup a project to add custom code.
1. Right click the form, then click the "Design"
2. Click "File" -> "Form Options"
3. Click "Programming" from the left tab
4. Change the programming language and the project path, Click OK button to close the dialog. For me, I'm gonna use C# to be the programming language
5. Click "Developer" > "Code Editor"
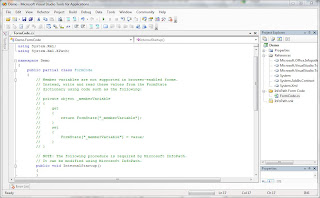
6. Then you will see the code editor, which is a Microsoft Visual Studio Tools for Applications
7, To insert a new record into the Products list, I want to have a button, which will insert a new line into the Product list when users click it. Now, close the code editor and go back to the form designer. Add a new button under the Product list.
8. Click the 'Properties' from the ribbon and then click the 'Control Properties'. In the pop up dialog, we can change it to a new label, like 'Insert'. And then click the OK button
9. Click the 'Custom Code' button from the ribbon. You will launch the code editor again. Now, you will see the 'Clicked' event handler method.
10. OK. Now, as I mentioned before, when users click the button, we need to insert a new record into the repeatable table. Enter the following code in the CTRL6_5_Clicked method:

   1:  string myNamespace = this.NamespaceManager.LookupNamespace("my");
   2:  System.Text.StringBuilder sBuilder = new System.Text.StringBuilder();
   3:  sBuilder.AppendFormat("<my:Product xmlns:my=\"{0}\">", myNamespace);
   4:  sBuilder.AppendFormat("<my:ProductID xmlns:my=\"{0}\"></my:ProductID>", myNamespace);
   5:  sBuilder.AppendFormat("<my:ProductTitle xmlns:my=\"{0}\"></my:ProductTitle>", myNamespace);
   6:  sBuilder.Append("</my:Product>");
   7:   
   8:  this.MainDataSource.CreateNavigator().SelectSingleNode("/my:Customer", this.NamespaceManager).AppendChild(sBuilder.ToString()); 


11. Now, you can build your project to generate the custom InfoPath Form. Click the 'Build' from the menu and then click 'Build Demo' menu item.
12. Close the 'Visual Studio Tools for Application' and then save your InfoPath Form.
13. Double click the xsn file to open a new form, click the Insert button, you will see a new line is inserted.